We use cookies to make your experience better. To comply with the new e-Privacy directive, we need to ask for your consent to set the cookies. Learn more.


How to Install Magento 2 Elasticsearch in linux server


Elasticsearch is an open-source distributed full-text search engine with an HTTP web interface and schema-free JSON documents. Elasticsearch is a quick and advanced search in product catalog. From Magento version 2.4 it is mandatory to setup elasticsearch for product catalog solution. For the Magento 2.4 version, you need to use the elasticsearch version 7.6+.
Elasticsearch is Developed in java.
Elasticsearch Installation for Magento 2.4 steps in Ubuntu
- Install Java Development Kit
- Install elasticsearch
- Configure and start elasticsearch
Install Java Development Kit
Navigate to user’s home directory and then first step to updating repository by below command
sudo apt-get update
Install JDK
To install java Development kit by
sudo apt-get install openjdk-8-jdk -y
Confirmation of installation of jdk
Run java -version (note keep small j in java)
java -version
Example output as below:

Installing Elasticsearch
Install dependency
sudo apt install apt-transport-https ca-certificates wget
Import repository GPG key:
wget -qO - https://artifacts.elastic.co/GPG-KEY-elasticsearch | sudo apt-key add -
Add elasticsearch repository to the system
sudo sh -c 'echo "deb https://artifacts.elastic.co/packages/7.x/apt stable main" > /etc/apt/sources.list.d/elastic-7.x.list'
Replace 7.x with necessary elasticsearch version, keep as it is if you are installing for magento2.4
After importing repository to system update system and then install elasticsearch
sudo apt update
sudo apt install elasticsearch
Configure and start Elasticsearch
Elasticsearch is installed and now we need to configure it and need to start it.
We have to change the network host
Open elasticsearch config file using below command
sudo nano /etc/elasticsearch/elasticsearch.yml
Update Network host:
Change network.host value to “localhost”. Default value is 192.168.X.X which you can remove also don't forget to remove preceding ‘#’ (comment).
Another configuration you can do but optional to do
Update cluster name;
Cluster.name write any relevant cluster name and remove preceding ‘#’
Update Node Name:
You can update node.name to a relevant name like “Magento 2_4” .
Additionally you can change the port of elasticsearch but by default it is 9200.
Http.port to anyport you want to use.
Also note that you need to enable the port inbound rule in the security group if you are using AWS server.
Save file but ctrl+x to exit, and press Y to save and press 'enter' to confirm.
Now start elasticsearch by below command
sudo systemctl start elasticsearch
To restart elasticsearch
sudo systemctl restart elasticsearch
Test elasticsearch
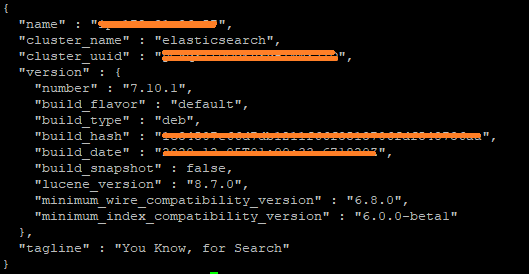
curl -X GET 'http://localhost:9200'
You will see result similar to below one:
If you are getting error to enable elasticsearch then you may need to change
If there is error due to memory Then you need to do below configuration
Elasticsearch is JVM application, so elasticsearch uses memory which are devoted to jvm.
Elasticsearch mostly depend on heapmemory which can be manually configurable in jvm options by -xms and -xmx value.
-Xms = initial size of heap space.
-Xmx = maximum size of heap space.
Open jvm.option file by below command
sudo nano /etc/elasticsearch/jvm.options
Allow no more than 25% of physical memory to heap spacie.
Example if you are running application in 1GB RAM then set below configuration
-Xms128m
-Xmx128m
Or
-Xms256m
-Xmx256m
Save file but ctrl+x to exit, and press Y to save and press 'enter' to confirm.
Now again restart elasticsearch by below command
sudo systemctl restart elasticsearch
Test Magento 2 elasticsearch
curl -X GET http://localhost:9200
You will ses similar result as below:
Yay! Your Magento2 Elasticsearch is ready now!
1 Comment(s)
danwil
Jan 25, 2021 11:48
it is usefull content, works fine